Once enabled, this feature clears itself every time you restart your PC, excluding any items you’ve pinned to your clipboard for regular access. New items overwrite older items as you copy them to your clipboard, but this could mean they take time to clear. If you’re in the habit of copying personal details (such as passwords or bank details) to your clipboard, you might be putting your data security at risk. That’s why it’s important to know how to clear certain items from your clipboard. If you want to know how to clear your clipboard history on Windows 10, here’s what you’ll need to do.
How to Enable or Disable Windows 10 Clipboard History
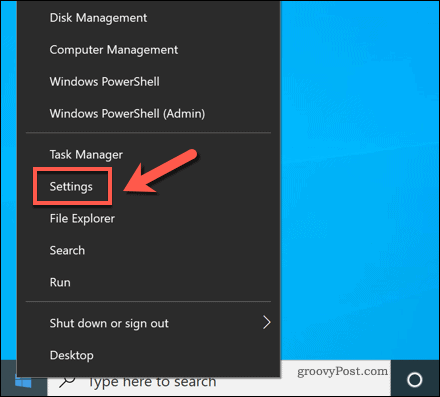
Windows 10 isn’t the best for privacy, with invasive telemetry data, location tracking, and other sensitive data recorded automatically by Microsoft. Thankfully, your clipboard history isn’t one of them—this feature (while it can useful) is disabled by default. To enable it (or disable it, should you wish to), you’ll need to open the Windows Settings menu. To do this, right-click the Start menu and press the Settings option.
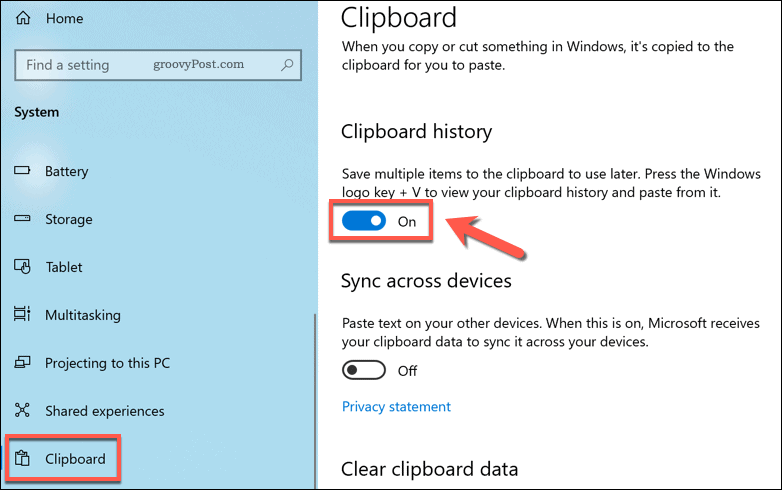
In the Settings window, press System > Clipboard. To enable or disable this feature, press the Clipboard history slider to the On or Off position.
Enabling the Windows 10 clipboard will activate the feature immediately. If you want to sync your clipboard history across other Windows devices, press the Sync across devices slider to the On position.
Once enabled, you’ll be able to access your history by pressing the Windows + V keys on your keyboard. The Clipboard panel will appear directly above the notifications area of the taskbar in the bottom-right corner.
If you decide to disable the clipboard, Windows will erase any items stored there (including pinned items). Any further items you save to your clipboard will overwrite the last. This returns your maximum clipboard history to one item, rather than the 25 items saved with this feature enabled.
How to Clear Your Windows 10 Clipboard History
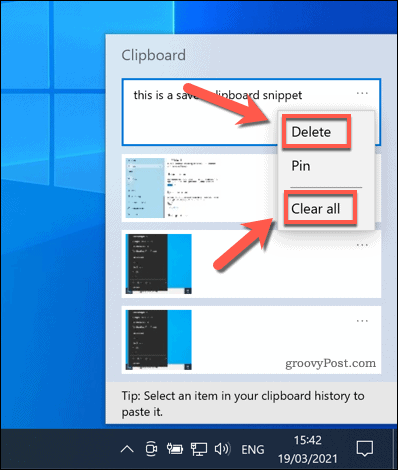
There are three clear methods for clearing your saved clipboard history on Windows 10. The quickest way to do so is to use the Clipboard panel—press Windows + V to view this. In the panel itself, you can clear individual items by pressing the three-dots menu icon and selecting the Delete option. This allows you to quickly remove sensitive content that you may have saved (including any items you’ve pinned to your clipboard). If you want to remove all of the saved items (excluding pinned items), however, press the three-dots menu icon, then select Clear all from the menu.
You can also wipe your clipboard history using the Windows Settings menu. To do this, right-click the Start menu and press Settings.
In the Settings menu, press System > Clipboard. In the Clipboard menu, press the Clear option in the Clear clipboard data section at the bottom.
You can also wipe your data by disabling the new clipboard history feature entirely—press the Clipboard history slider to do this.
The final method for clearing your clipboard history is to restart your PC. Every time you restart, any saved items (excluding pinned items) are wiped from the history. To quickly restart your PC, right-click the Start menu and select Shutdown or sign out > Restart.
Improving Security on Windows 10
By clearing your Windows 10 clipboard history, you’re ensuring that sensitive data you copy is erased as soon as it’s used. You may need to take other steps to protect yourself, however, especially if keyloggers and other malware are monitoring your keyboard usage. If this is the case, it’s important to schedule regular checks using the built-in Microsoft Defender antivirus. If you’re infected, you can schedule a boot scan to remove any malware before you next boot up.
![]()


