Note: This tutorial covers resizing images in Microsoft Windows, instructions may vary for many of the other operating systems that ImageMagick will run on. You may need to be logged in as an administrator to properly install ImageMagick. To make this easy, before we get started you’ll need to put all of the pictures that you would like to resize into one folder on your computer.
Step 1 – Download
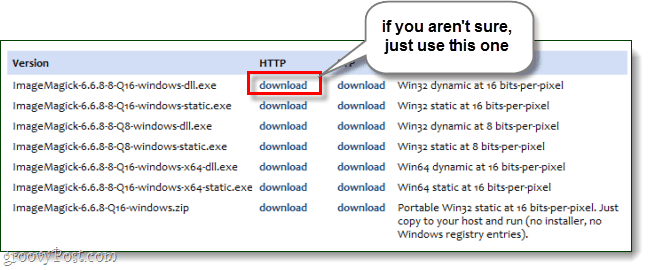
Visit the ImageMagick download page* and grab the installer that matches your operating system. If you aren’t sure which one to use, just grab the top one (win32 dynamic at 16 bits-per-pixel).
Step 2
Installation is simple, just Click Next a few times.
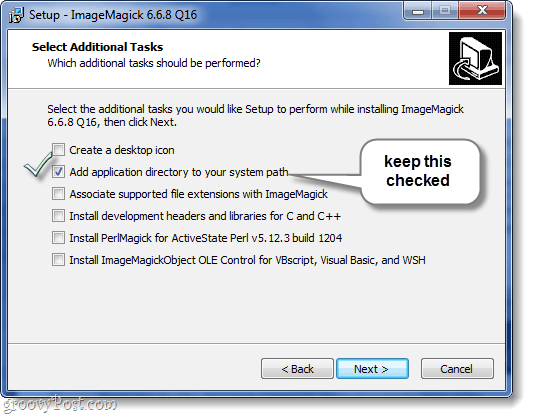
During installation you can remove the desktop icon option if you want, and add others – just make sure that Add application directory to your system path remains checked! This makes it so the cmd prompt in windows recognizes ImageMagick commands.
Once installation is finished, it’s time to open up the cmd prompt.
Step 3
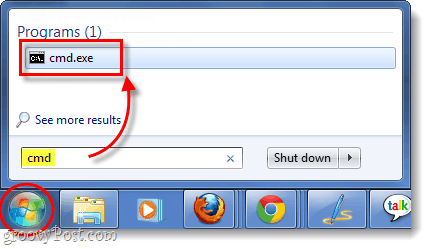
Click the Windows Start Menu Orb and then Type cmd into the search box and Press Enter.
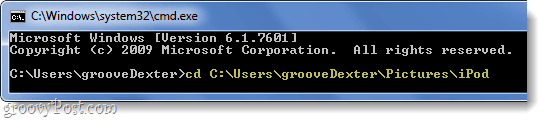
Step 4
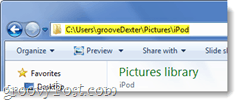
Now we need to change our directory to that of the folder your photos are located in. To do this use the cd (change directory) command. An easy way to get the correct folder path is just to copy it out of the address bar while viewing the folder in explorer. You can then Right-Click in the cmd prompt to Paste it in. All you need to do is type in cd folderpath. For example the folder full of photos that I want to resize is cd C:\Users\grooveDexter\Pictures\iPod.
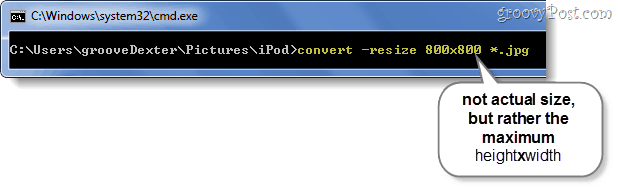
Step 5
Now that we’re in the correct folder, we just need to enter the correct ImageMagick command. To resize, use the following command: You can customize a few different parts of this command to meet your needs.
800×800 – This is your maximum widthxheight in pixels. Your photo will keep its aspect ratio but it will always be resized to smaller than the numbers you input.*.jpg – If you have photos that are in PNG, GIF, or some other format you will need to change this to match the file extension of your photo.convert – The convert command is necessary, and it will create a copy of your images; rather than overwriting them. If you would like your photos to be directly manipulated without creating a copy, change convert to mogrify. More ImageMagick commands can be found here.
Done!
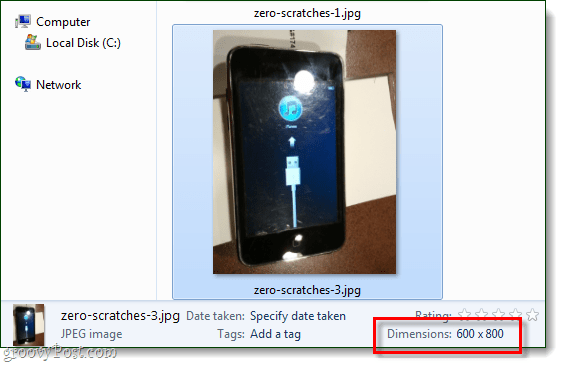
If you used the convert command you’ll have resized copies of your images, whereas if you used mogrify your photos will have been directly resized. Now all of your photos should be resized to less than 800×800 (or whatever size you specified) so you can upload and share them with ease. But we know that you likely just needed this for uploading unlimited photos to Picasa. ;)
Comment Name * Email *
Δ Save my name and email and send me emails as new comments are made to this post.


![]()
